Location-wise stock for WooCommerce allows store owners to manage inventory separately for each store, warehouse, or branch from a single dashboard. This approach ensures accurate stock tracking, prevents overselling, and helps route orders based on product availability at specific locations.
For growing businesses handling multiple warehouses or physical stores, location-based inventory control becomes essential for smooth operations. It improves fulfillment speed, reduces manual errors, and gives better visibility into stock levels across all locations, making inventory management more reliable and scalable.
What Is Location-Wise Stock in WooCommerce?
Before understanding how to use it, it’s important to clearly define what location-based inventory actually means in WooCommerce and how it works in real scenarios.
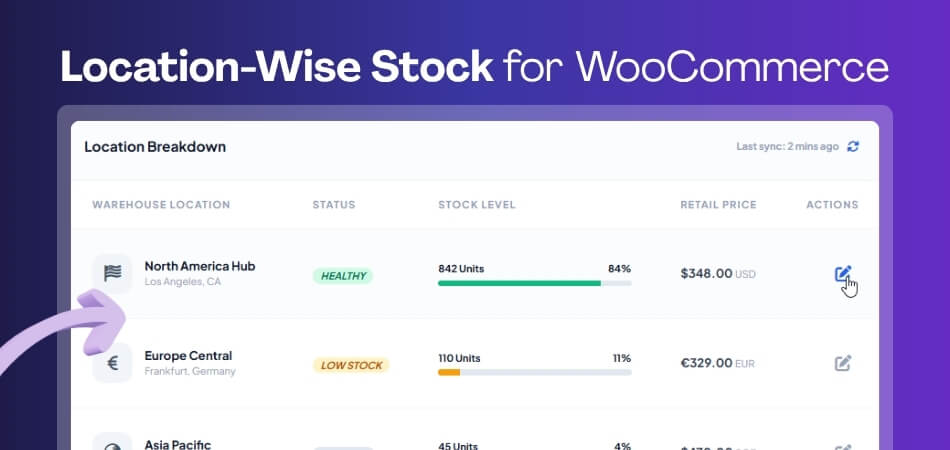
Location-wise stock in WooCommerce refers to managing product inventory separately for each physical or virtual location such as warehouses, retail stores, or distribution centers. Instead of keeping one global stock quantity, you assign and track stock levels individually for every location.
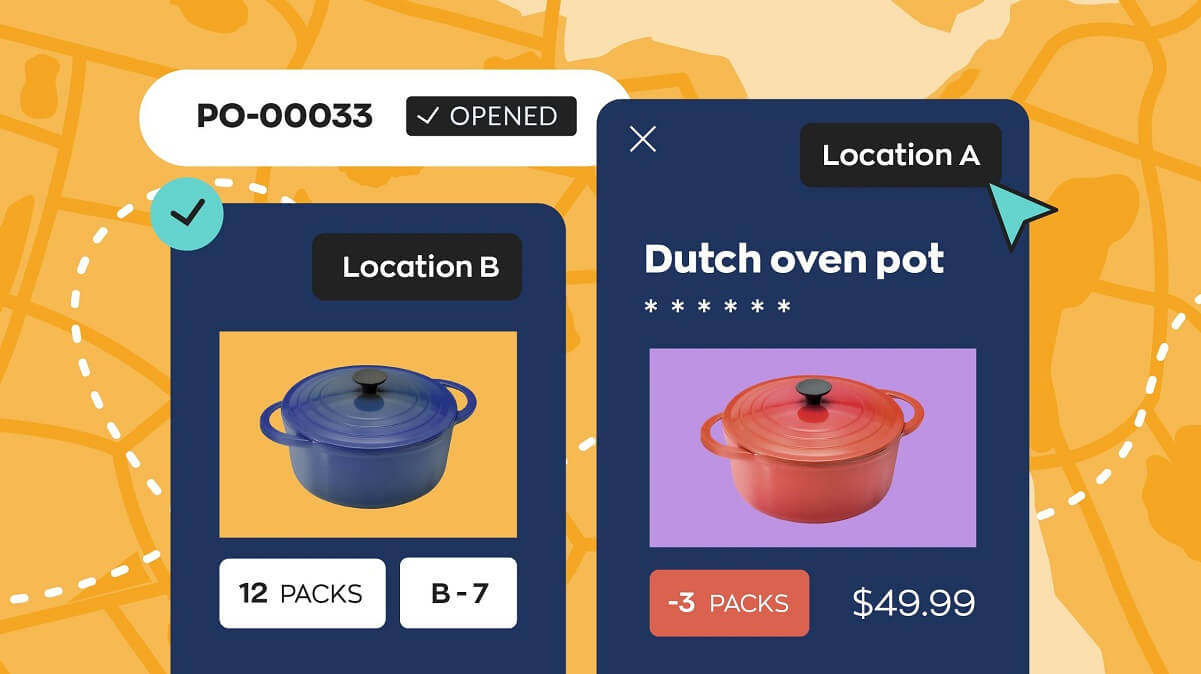
This means a product can have different stock quantities in different places. For example, one warehouse may have 50 units while another store has 10 units of the same product. This setup helps ensure that orders are fulfilled from the nearest or most appropriate location.
By using location-wise stock management, store owners gain better control over inventory distribution, reduce stock mismatches, and improve overall order accuracy. It also creates a strong foundation for advanced features like location-based shipping, pricing, and order routing.
Location-wise stock helps WooCommerce stores manage inventory per location, ensuring accurate stock control, better order handling, and improved operational efficiency across multiple warehouses or stores.
Why Location-Wise Stock Management Matters
Now that you understand the concept, it’s important to see why location-wise stock management is not just a feature but a necessity for growing WooCommerce stores. Below are the key reasons that directly impact performance, accuracy, and scalability.
Prevent Overselling and Stock Conflicts
When you manage inventory globally, WooCommerce cannot differentiate stock between locations. This often leads to overselling or selling items that are unavailable in a specific store. Location-wise stock ensures each location has its own quantity, reducing conflicts and keeping stock data accurate in real time.
Improve Order Fulfillment Speed
With stock assigned per location, orders can be fulfilled from the nearest warehouse or store. This reduces shipping time, lowers delivery costs, and improves customer satisfaction. Faster fulfillment also helps stores compete better in high-demand markets.
Better Inventory Visibility and Control
Location-based stock management gives you a clear view of how much inventory is available at each location. This helps in making smarter decisions about restocking, transferring products, and managing demand across different regions without relying on guesswork.
Reduce Manual Errors and Operational Complexity
Managing stock manually across multiple locations increases the risk of human error. With a proper system in place, stock updates happen automatically per location, reducing mistakes and saving time for store managers and teams.
Enable Scalable Business Growth
As your business expands to multiple warehouses or retail stores, managing inventory centrally becomes inefficient. Location-wise stock provides a scalable structure that supports growth without breaking your operations or causing stock inconsistencies.
Location-wise stock management improves accuracy, speeds up fulfillment, and supports scalable WooCommerce operations by giving full control over inventory across multiple stores and warehouses.
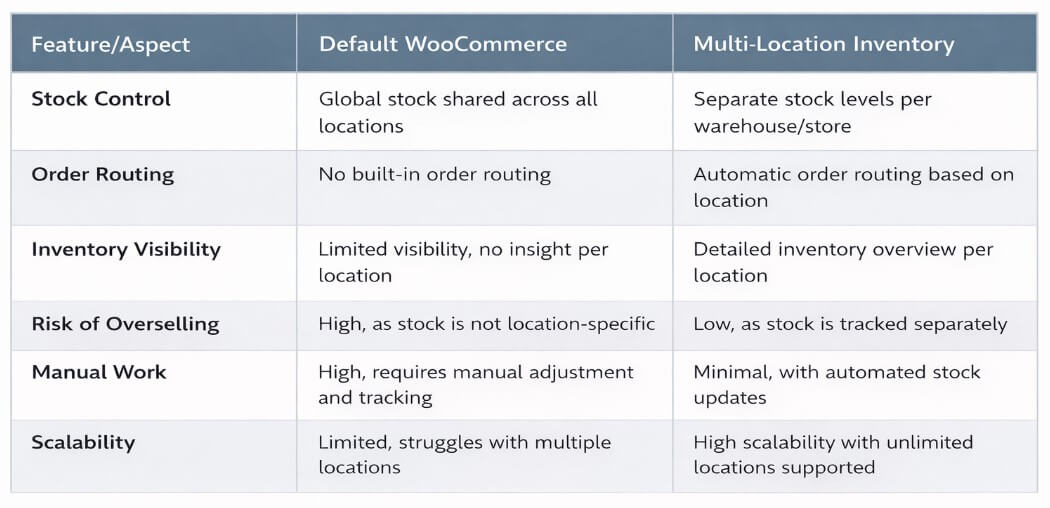
Where Default WooCommerce Falls Short
Before setting up location-wise stock, it’s important to understand the limitations of WooCommerce’s default inventory system. This helps explain why a multi-location approach becomes necessary as your store grows.
No Location-Based Stock Control
WooCommerce manages inventory at a global level, meaning it treats all stock as a single pool. It does not allow you to assign or track stock separately for different warehouses or stores, which becomes a major limitation for multi-location businesses.
No Built-In Order Routing
By default, WooCommerce cannot route orders based on location or stock availability. This means orders may not be fulfilled from the nearest or most suitable location, leading to slower delivery and higher shipping costs.
Limited Inventory Visibility
Store owners cannot see how stock is distributed across different locations because WooCommerce does not support location-level tracking. This lack of visibility makes it harder to manage inventory efficiently and plan restocking.
Higher Risk of Stock Errors
Without location-wise stock management, businesses often rely on manual processes or external tracking. This increases the risk of stock mismatches, overselling, and incorrect inventory data across stores.
Not Scalable for Multi-Store Operations
As your business grows, managing all inventory from a single stock system becomes inefficient. WooCommerce’s default setup is not designed for handling multiple warehouses or store-level inventory control.
Default WooCommerce inventory lacks location-based control, making it unsuitable for multi-store setups and increasing the risk of stock errors, slow fulfillment, and inefficient inventory management.
How to Enable Location-Wise Stock in WooCommerce?
After understanding its importance, the next step is setting up location-wise stock in WooCommerce. Since WooCommerce does not support this feature by default, you need a structured approach using the right tools and configuration.
Use a Multi-Location Inventory Plugin
WooCommerce only supports global stock management out of the box. To manage stock by location, you need a dedicated plugin that allows you to create multiple locations and assign inventory separately. A reliable plugin makes the entire setup easier and scalable for future growth.
Create and Configure Locations
Once the plugin is installed, the first step is to add your locations. These can be warehouses, retail stores, or distribution centers. Each location should be clearly defined so you can assign stock and manage operations without confusion.
Assign Stock Per Location
After setting up locations, you can assign stock quantities for each product based on location. This means the same product will have different stock levels depending on where it is stored, giving you precise control over inventory distribution.
Enable Order Routing by Location
Many advanced plugins allow automatic order routing based on stock availability or customer location. This ensures that orders are fulfilled from the most suitable location, improving delivery speed and reducing logistics costs.
Sync Inventory in Real-Time
To avoid stock mismatches, real-time syncing is essential. Any change in stock at one location should instantly reflect in the system. This keeps your inventory accurate and prevents issues like overselling or incorrect stock display.
Enabling location-wise stock in WooCommerce requires a plugin-based setup, allowing you to manage inventory per location, automate order routing, and maintain accurate stock across all stores.
Key Features of Location-Based Inventory Management
After setting up location-wise stock, the real value comes from the features that help you control, automate, and scale your inventory operations. These features make multi-location management efficient and reliable for WooCommerce stores.
Set Stock Levels for Each Location
You can assign and manage stock quantities separately for every warehouse, store, or branch. This ensures accurate inventory tracking and prevents confusion that comes with managing a single global stock.
Real-Time Inventory Sync Across Locations
Stock updates happen instantly whenever a product is sold, restocked, or transferred. This real-time synchronization keeps inventory data consistent across all locations and reduces the risk of overselling.
Location-Based Order Routing
Orders can be automatically assigned to the nearest or most suitable location based on stock availability or customer location. This improves delivery speed and reduces shipping costs significantly.
Control Product Availability by Location
You can decide which products are available in specific locations. This is useful when certain items are only stocked in selected warehouses or stores, helping you manage regional demand effectively.
Location-Based Shipping and Pickup Options
Customers can choose delivery from nearby locations or select local pickup options. This enhances the shopping experience and gives more flexibility in how orders are fulfilled.
Centralized Inventory Dashboard
Manage all locations from a single dashboard with clear visibility of stock levels, movements, and performance. This simplifies inventory management and saves time for store owners and teams.
Location-based inventory features give WooCommerce stores full control over stock distribution, improve order fulfillment, and streamline operations across multiple locations with real-time accuracy.
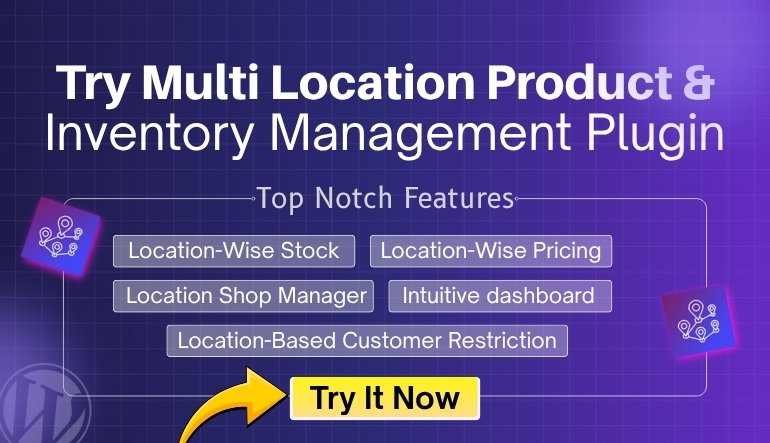
Recommended: Multi Location Product & Inventory Management for WooCommerce (Plugincy)
This is an all-in-one solution designed specifically for WooCommerce stores that need full control over inventory across multiple locations such as warehouses, retail stores, or regional branches.
It allows you to manage stock centrally while keeping quantities, pricing, and availability separate for each location. This makes it ideal for growing businesses that want accuracy, automation, and scalability in one system.
Why Multi Location Inventory Management By Plugincy
Centralized Multi-Location Control
You can manage unlimited locations from a single dashboard and assign stock per location easily. This ensures better visibility and control across your entire inventory system.
Real-Time Stock Synchronization
Stock updates automatically whenever a product is sold or restocked, keeping inventory accurate across all locations and preventing overselling.
Location-Based Product Availability
You can control which products are visible in specific locations, ensuring customers only see items available in their selected store.
Smart Order Routing
Orders can be fulfilled from the nearest or most suitable location, improving delivery speed and reducing shipping costs.
Location-Based Pricing and Shipping
You can set different prices, shipping methods, and payment options based on location, allowing more flexible business operations.
Alternative Plugins
To give context and improve EEAT, here are some other options:
- Addify Multi Inventory Management: Supports multiple inventories per product with location-based pricing and customer selection options.
- Multiloca Lite (Free Version): Good for basic setups, allows unlimited locations and separate stock tracking per store.
- Stock Locations for WooCommerce: Lightweight solution for simple location-based stock management with REST API support.
If your goal is to build a scalable WooCommerce store with multiple warehouses or retail locations, using a complete solution like Plugincy’s plugin is the best choice. It combines inventory control, order routing, and location-based logic in one system, avoiding the need for multiple plugins or custom setups.
Choosing the right plugin for location-wise stock ensures accurate inventory tracking, faster fulfillment, and scalable WooCommerce operations across multiple locations with minimal manual effort.
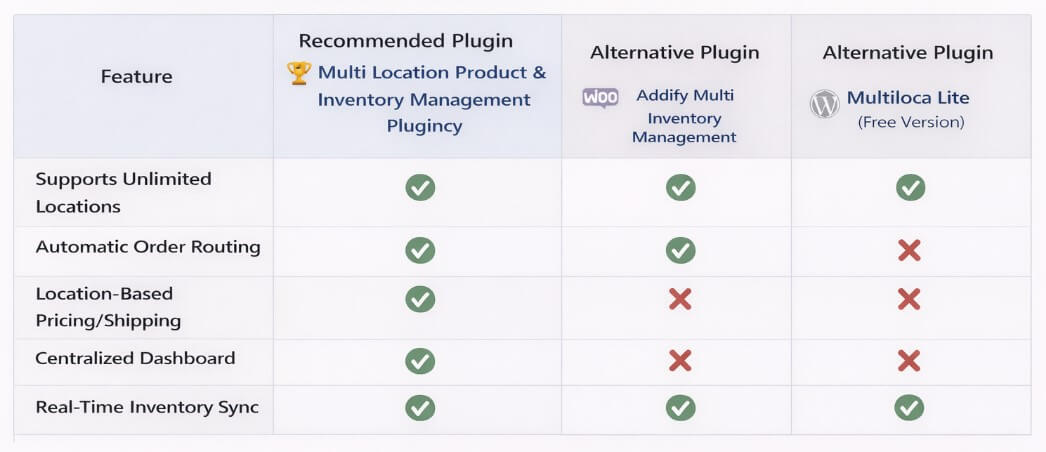
Plugin Comparison: Location-Wise Stock Solutions for WooCommerce
To help you choose the right solution, here’s a detailed comparison between the recommended plugin and other alternatives based on features, scalability, and real-world usability.
| Feature / Capability | Plugincy Multi Location Inventory (Recommended) | Addify Multi Inventory Management | Multiloca Lite (Free) | Stock Locations for WooCommerce |
| Multi-Location Stock Management | ✅ Full support with unlimited locations | ✅ Supports multiple inventories | ✅ Supports multiple locations | ✅ Basic support |
| Stock Per Location | ✅ Advanced control per location | ✅ Available per inventory | ✅ Available | ✅ Limited |
| Real-Time Inventory Sync | ✅ Yes (automatic sync) | ⚠️ Partial (depends on setup) | ⚠️ Basic sync | ❌ Limited |
| Order Routing by Location | ✅ Smart automatic routing | ⚠️ Manual / limited automation | ⚠️ Basic | ❌ Not available |
| Location-Based Product Visibility | ✅ Full control per store/location | ✅ Available | ✅ Available | ❌ Not supported |
| Location-Based Pricing & Shipping | ✅ Advanced (pricing, tax, payment rules) | ✅ Supported | ❌ Not available | ❌ Not available |
| Centralized Dashboard | ✅ Advanced analytics & reporting | ✅ Dashboard available | ⚠️ Basic dashboard | ⚠️ Minimal |
| CSV Import/Export | ✅ Yes (bulk management) | ✅ Yes | ❌ Limited | ❌ No |
| Scalability (Multi-store / Warehouse) | ✅ High (enterprise ready) | ✅ Medium to High | ⚠️ Limited | ❌ Low |
| Ease of Use | ✅ Beginner-friendly + advanced control | ⚠️ متوسط (medium complexity) | ✅ Easy | ✅ Easy |
| Best For | Growing & large WooCommerce stores | Medium businesses | Small stores | Simple setups |
Key Insight
- Plugincy plugin = All-in-one solution (inventory + routing + pricing + analytics)
- Addify = Strong but slightly complex and less automated
- Multiloca Lite = Good for beginners but limited features
- Stock Locations = Basic use only, not scalable
A powerful comparison shows that while many plugins offer basic multi-location support, only a complete solution provides real-time sync, automation, and scalability for growing WooCommerce businesses.
Step-by-Step Guide to Set Up Location-Wise Stock in WooCommerce
Setting up location-wise stock in WooCommerce becomes simple when you follow the correct process using a reliable plugin. In this guide, you will learn how to install, configure, and manage inventory using both the free and PRO versions of the Plugincy Multi Location Inventory plugin.
This step-by-step setup helps you create locations, assign stock per store, and control inventory flow efficiently without manual errors.
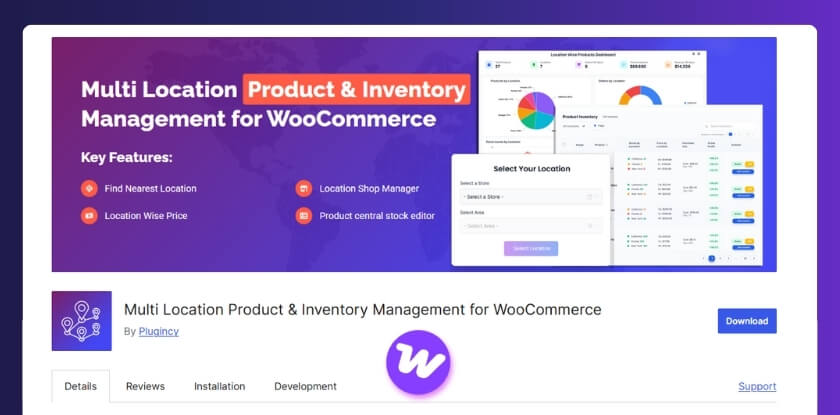
Step 1: Install and Activate the Plugin (Free & PRO)
To get started, you need to install the Multi Location Product & Inventory Management plugin by Plugincy from your WordPress dashboard. The free version is available in the WordPress repository, while the PRO version can be uploaded manually after purchase.
Install Free Version (WordPress.org)
- Go to your WordPress Admin Dashboard
- Navigate to Plugins → Add New
- Search for “Multi Location Product & Inventory Management for WooCommerce”
- Click Install Now and then Activate
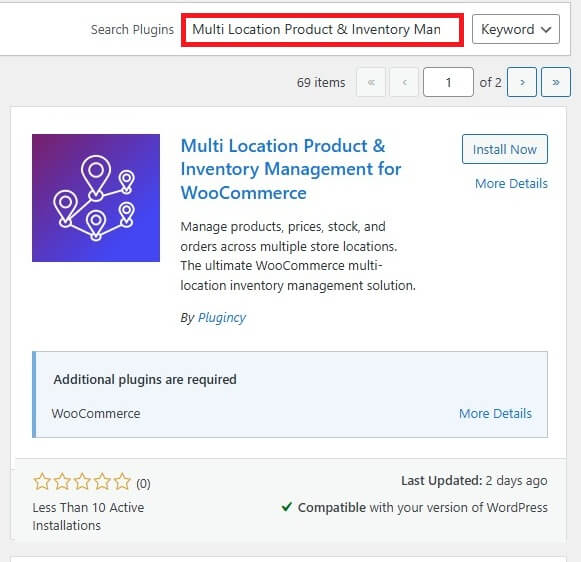
The free version is suitable for basic setups where you want to manage stock across multiple locations with essential features.
Install PRO Version (Advanced Features)
- Download the PRO plugin file from Plugincy
- Go to Plugins → Add New → Upload Plugin
- Upload the ZIP file and click Install Now
- Activate the plugin after installation
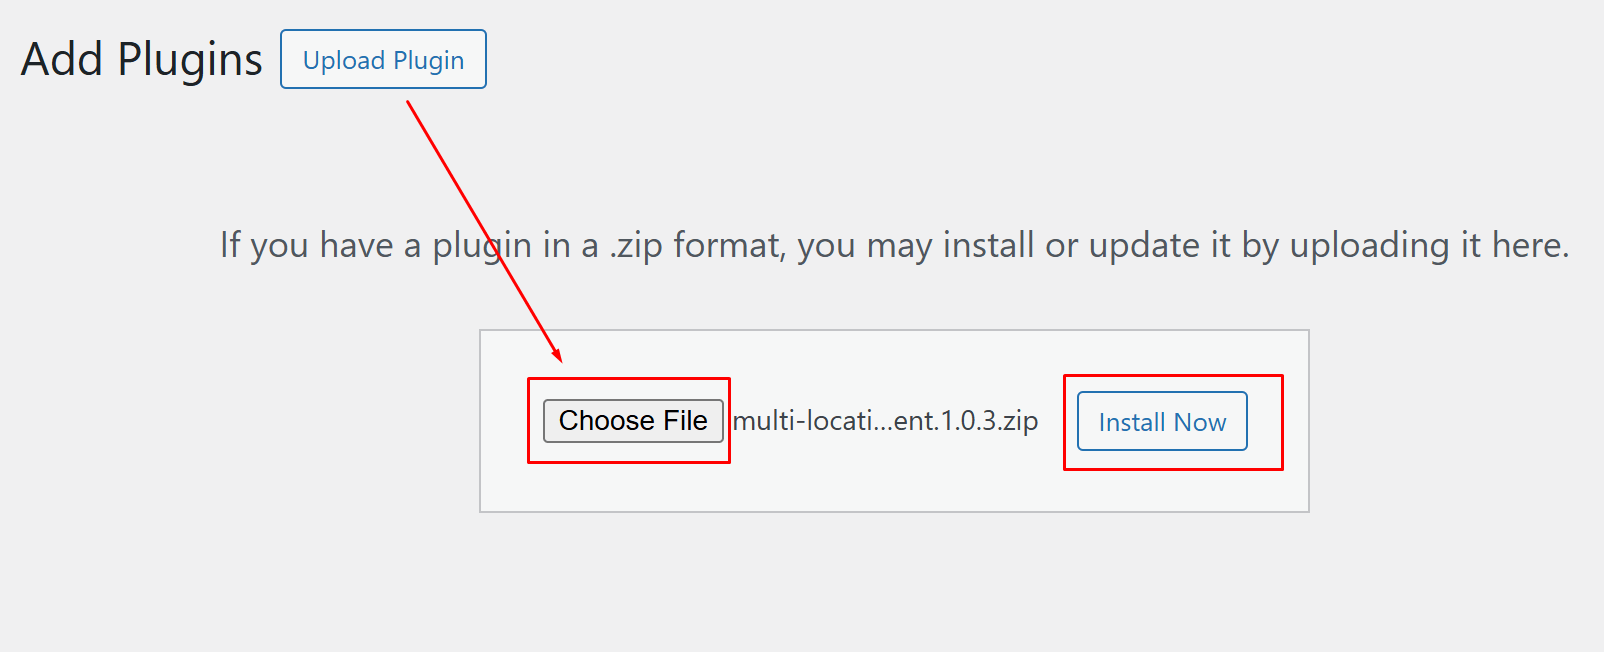
The PRO version unlocks advanced features like automatic order routing, location-based pricing, detailed analytics, and better inventory control for scaling businesses.
What Happens After Activation?
Once the plugin is activated, a new multi-location inventory menu will appear in your WooCommerce dashboard. From here, you can start creating locations, assigning stock, and configuring location-based settings.
Step 2: Create Store Locations
After installing the plugin, the next step is to create and organize your store locations. This step is important because all your inventory, order routing, and stock control will depend on how accurately your locations are set up.
Follow the steps below to add and manage locations inside WooCommerce:
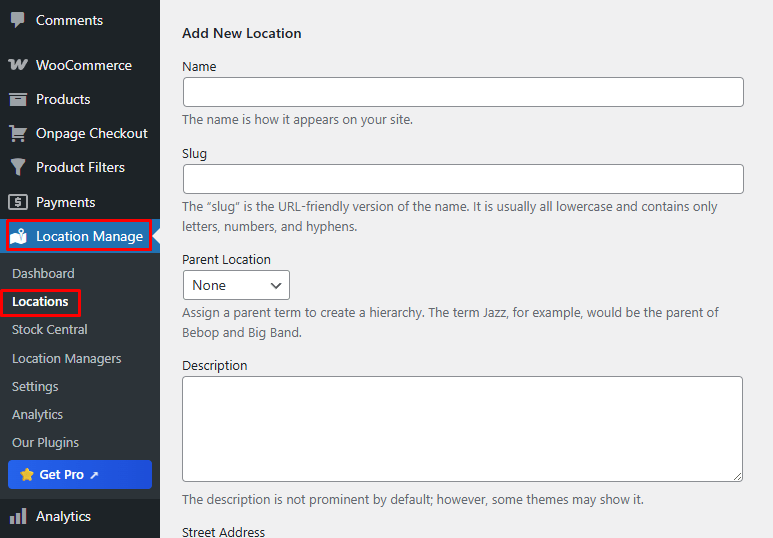
How to Add Store Locations
- Go to Location Manage → Locations from your dashboard
- Click on Add New Location
- Enter the location name (e.g., Warehouse Dhaka, Store NYC)
- Add the full address for accurate shipping and mapping
- Set the operating hours if needed for store visibility
- Add contact information such as phone or email
- Click Save Location to confirm
Repeat this process for each warehouse, store, or branch you want to manage.
Pro Tips for Better Setup
- Use clear naming like “Warehouse-1” or “City Store” to avoid confusion
- Keep address details accurate for location-based shipping and pickup
- Add contact details to improve customer trust and local store experience
Creating well-structured store locations ensures accurate stock assignment, better order routing, and smooth inventory management across all WooCommerce locations.
Step 3: Assign Products to Locations
Once your store locations are created, the next step is to assign products to specific locations. This is where location-wise stock management actually starts working, allowing you to control where each product is available and stocked.
By assigning products to locations, you ensure accurate inventory distribution and enable location-based order fulfillment.
How to Assign Products to Locations
- Open any product from your WooCommerce dashboard
- Scroll down to find the Locations section in product settings
- Select one or multiple locations where the product is available
- Assign stock based on selected locations (if enabled)
- Click Update or Publish to save changes
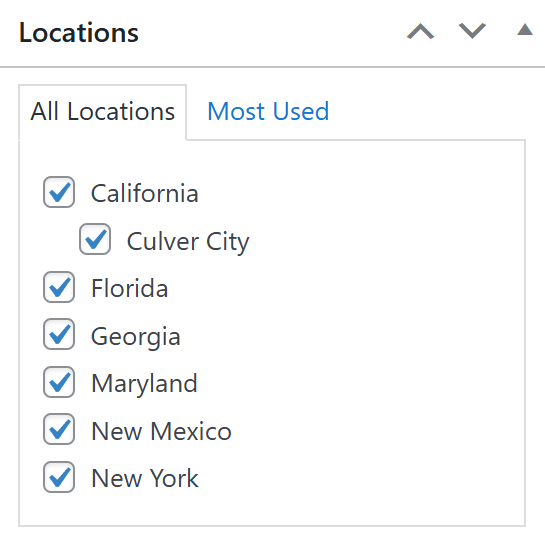
This allows the same product to exist in multiple locations with proper control over availability.
How It Works in Real Use
For example, you can assign a product to “New York” and “California” but not “Florida.” This means customers from those regions will see accurate stock availability, and orders can be fulfilled from the selected locations only.
Pro Tips for Better Control
- Assign only relevant locations to avoid stock confusion
- Use multiple locations for fast-moving products
- Combine this with stock quantity per location for full control
Assigning products to locations ensures accurate inventory distribution, improves order routing, and enables WooCommerce stores to manage stock efficiently across multiple locations.
Step 4: Configure General Settings
After assigning products to locations, the next step is to configure the general settings. This step ensures your location-wise stock system works smoothly with proper display, inventory sync, and pricing behavior across your WooCommerce store.
These settings control how locations appear on the frontend and how inventory behaves behind the scenes.
How to Configure General Settings
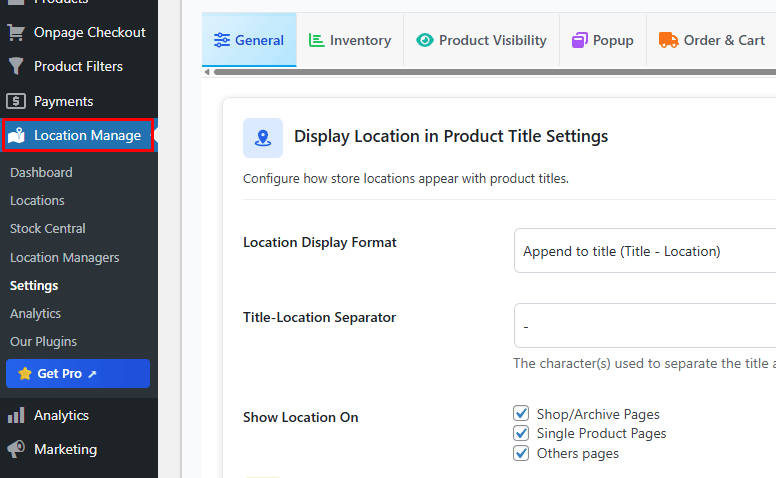
- Go to Location Manage → Settings from your dashboard
- Open the General tab to access core configuration options
- Review all available settings carefully before making changes
- Click Save Changes after updating settings
Key Settings You Should Configure
Location Display in Product Title
You can choose how the location name appears with product titles. For example, showing “Product Name – New York” helps customers understand availability instantly.
Inventory Sync Settings
Control how stock updates across locations. You can enable real-time sync to automatically update inventory when orders are placed or stock is changed.
Product Visibility by Location
Decide where location information should be displayed, such as shop pages, product pages, or other sections. This improves user experience and helps customers find available products faster.
Price Update Settings (PRO Feature)
In the PRO version, you can configure location-based pricing. This allows different prices depending on the store or region, which is useful for multi-market businesses.
Pro Tips for Better Configuration
- Enable location display on product pages for better clarity
- Use real-time sync to avoid stock mismatches
- Keep settings simple at first, then optimize based on store needs
Configuring general settings ensures your location-wise stock system runs efficiently, improves product visibility, and maintains accurate inventory behavior across all WooCommerce locations.
Step 5: Manage Stock and Prices Per Location
After completing the setup, this is the most important step where you gain full control over your inventory. Managing stock and prices per location allows you to define how much inventory is available and how products are priced in each store or warehouse.
This step ensures accurate stock tracking, flexible pricing, and better order management across all locations.
How to Manage Stock and Prices
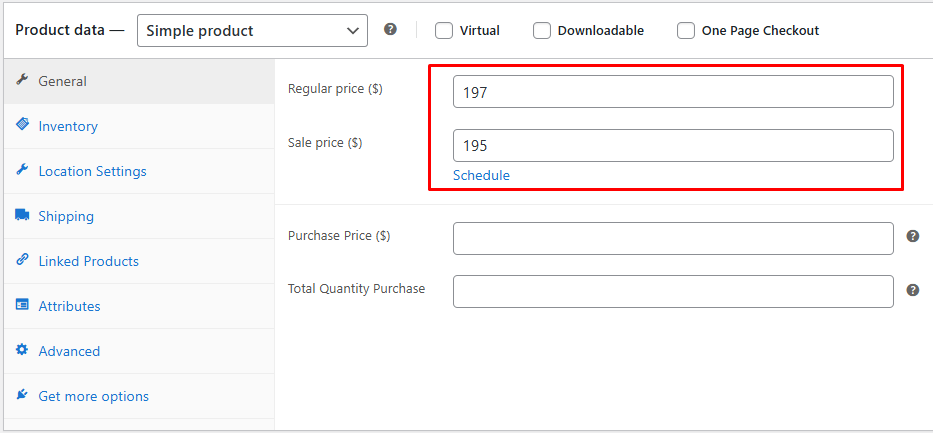
- Open any product in your WooCommerce dashboard
- Go to the Location Settings / Inventory section
- Select a specific location
- Enter the stock quantity for that location
- Set the price (regular or sale) if location-based pricing is enabled
- Configure backorder options if needed
- Click Update to save changes
Repeat this process for each location where the product is available.
Key Controls Explained
Stock Level Per Location
You can assign different stock quantities for each location. For example, one warehouse may have 100 units while another has 20 units of the same product.
Location-Based Pricing (PRO Feature)
Set different prices depending on the location. This is useful for handling regional pricing strategies, shipping costs, or local demand differences.
Backorder Settings
Control whether customers can place orders when a product is out of stock at a specific location. This helps manage demand without losing potential sales.
Pro Tips for Better Inventory Control
- Keep stock updated regularly to avoid overselling
- Use location-based pricing for regional profit optimization
- Disable backorders for low-stock locations to prevent issues
Endnote
Managing stock and prices per location gives WooCommerce stores full control over inventory, improves pricing flexibility, and ensures accurate stock handling across multiple locations.
Step 6: Add Location Selector to Your Store
After setting up locations and assigning stock, the final step is to allow customers to select their preferred location on the frontend. This is done by adding a location selector to your store using a shortcode.
The location selector helps display location-based products, prices, and stock availability, improving user experience and order accuracy.
How to Add Location Selector
- Copy the shortcode:
[mulopimfwc_store_location_selector] - Go to any page, post, or widget area in your WordPress dashboard
- Paste the shortcode where you want the selector to appear (header, footer, or page)
- Click Update or Publish to save changes
Advanced Shortcode Example (Optional)
You can use advanced options to customize the selector:
[mulopimfwc_store_location_selector show_title=”off” use_select2=”on” hierarchical=”1″ show_count=”on” enable_user_locations=”on”]
This allows better UI, dropdown styling, and improved location selection experience for users.
Best Placement for Maximum Impact
- Header (for visibility on all pages)
- Shop page (for product filtering by location)
- Sidebar or footer (for easy access)
Why This Step Is Important
Without a location selector, users cannot choose their preferred store or warehouse. Adding this ensures customers see accurate stock, correct pricing, and location-specific availability.
Adding a location selector enables customers to choose their preferred store, ensuring accurate product availability, better user experience, and proper location-based inventory functionality in WooCommerce.
Step 7: Add Location Selector Using Widgets
If you want to display the location selector across your entire site, adding it through widgets is one of the best options. This ensures users can easily switch locations from the header, footer, or sidebar.
How to Add via Widgets
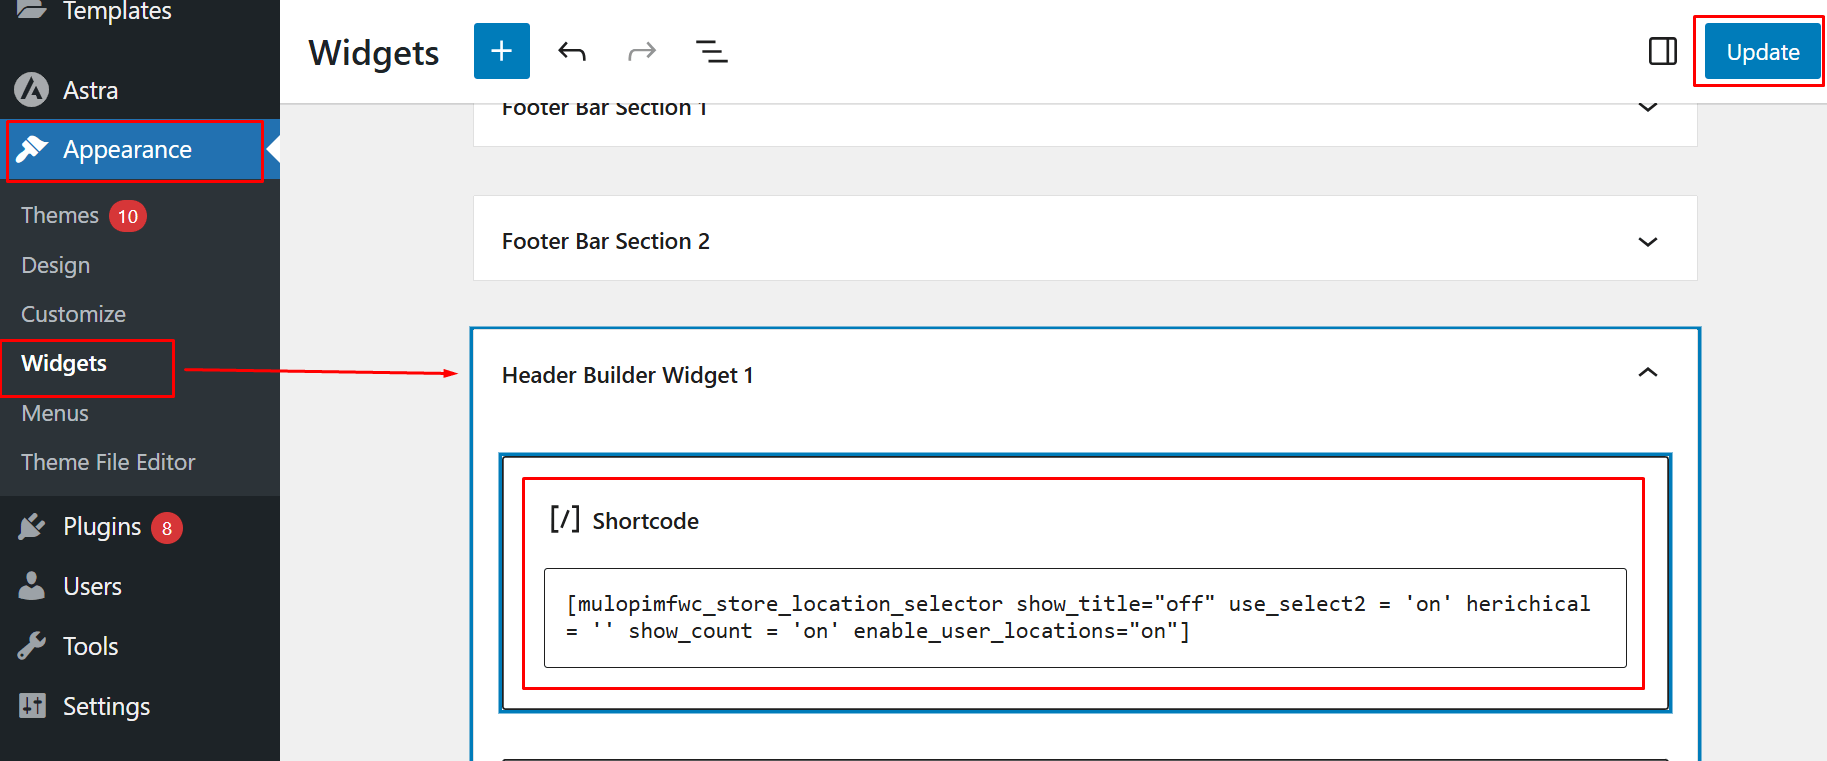
- Go to Appearance → Widgets
- Open your desired widget area (e.g., Header Builder, Sidebar, Footer)
- Add a Shortcode block
- Paste the shortcode:
[mulopimfwc_store_location_selector] - Click Update to save changes
This method is ideal for making the location selector visible on all pages.
Pro Tips for Widget Placement
- Use header placement for maximum visibility
- Use sidebar for shop-focused navigation
- Keep it accessible but not distracting
Step 8: Add Location Selector Through Code
For advanced users or developers, you can directly add the location selector using PHP code. This method is useful when customizing themes or integrating the selector into specific template files.
PHP Code Example
<?php echo do_shortcode(‘[mulopimfwc_store_location_selector]’); ?>
Add this code inside your theme files like header.php, footer.php, or any custom template where you want the selector to appear.
When to Use This Method
- When building custom WooCommerce themes
- When shortcode placement is not flexible enough
- When you need full control over layout and design
Step 9: Test the Setup
After completing the setup, testing is essential to ensure everything works correctly. This step helps verify that your location-wise stock system is functioning as expected.
How to Test Your Setup
- Open your shop page
- Select a store location using the selector
- Check if products update based on location
- Verify that prices change correctly (if enabled)
- Confirm that stock levels are accurate
- Ensure each location displays the correct data
Why Testing Is Important
Testing ensures that customers see accurate stock, correct pricing, and proper product availability. It also helps identify any setup issues before going live.
Testing your location-wise stock setup ensures accurate product display, correct pricing, and smooth functionality across all WooCommerce locations for a reliable shopping experience.
Who Needs Location-Wise Stock in WooCommerce?
Not every WooCommerce store requires location-wise stock management, but for many growing businesses, it becomes essential for maintaining accuracy, speed, and scalability. Below are the types of businesses that benefit the most from this system.
Multi-Warehouse Businesses
Stores that operate multiple warehouses need to manage stock separately for each location. Location-wise stock helps track inventory accurately, avoid confusion, and ensure orders are fulfilled from the correct warehouse.
Retail Stores with Multiple Branches
Businesses with physical stores in different cities or regions require location-based inventory to manage stock per branch. This ensures customers see the correct availability based on their selected store.
eCommerce Stores with Regional Fulfillment
If your store serves customers across different regions, location-wise stock allows you to ship from the nearest location. This reduces delivery time and lowers shipping costs significantly.
Dropshipping with Multiple Suppliers
Stores working with multiple suppliers can treat each supplier as a separate location. This helps manage stock availability more efficiently and ensures orders are routed to the right supplier.
Wholesale and B2B Stores
Wholesale businesses often manage bulk inventory across different storage locations. Location-wise stock helps maintain accurate stock levels and improves order processing for large-volume transactions.
Growing WooCommerce Stores
As your business expands, managing all inventory from a single stock system becomes inefficient. Location-wise inventory provides a scalable solution that supports growth without operational issues.
Key Insight: If you manage inventory across more than one location, warehouse, or supplier, using location-wise stock is not optional anymore. It becomes a necessary system for accuracy, automation, and business growth.
Location-wise stock is essential for multi-location WooCommerce stores, helping manage inventory accurately, improve fulfillment speed, and support scalable business operations.
Common Mistakes + Troubleshooting for Location-Wise Stock in WooCommerce
Even with the right setup, small mistakes can break inventory accuracy and order flow. Below are the most common issues and how to fix them quickly to keep your location-wise stock system running smoothly.
Not Assigning Products to Locations
If products are not linked to any location, they may not appear correctly or show wrong stock.
Fix:
Always assign at least one location to every product. Double-check the Locations section inside product settings before publishing.
Stock Not Updating Across Locations
Sometimes stock does not sync after orders or manual updates, leading to mismatched inventory.
Fix:
Enable real-time inventory sync in settings and ensure no caching or conflicting plugins are blocking updates.
Location Selector Not Working
Users cannot switch locations or products do not update after selection.
Fix:
- Verify the shortcode is added correctly
- Clear cache (site + browser)
- Check JavaScript conflicts or theme issues
Wrong Products Showing for Locations
Customers may see products that are not available in their selected location.
Fix:
Enable location-based product visibility and make sure products are assigned only to relevant locations.
Pricing Not Changing by Location
Location-based pricing may not reflect on the frontend.
Fix:
- Ensure PRO features are enabled
- Check pricing settings per location
- Clear cache after updates
Orders Not Routing Correctly
Orders may go to the wrong warehouse or store.
Fix:
Configure order routing rules properly and test different scenarios to ensure correct behavior.
Ignoring Testing Before Going Live
Many issues happen because the setup is not tested properly.
Fix:
Always test:
- Product availability per location
- Stock updates after purchase
- Pricing behavior
- Location selector functionality
Plugin Conflicts or Theme Issues
Some themes or plugins can interfere with location-based features.
Fix:
- Test with a default theme (like Astra or Storefront)
- Disable conflicting plugins one by one
- Keep all plugins updated
Avoiding common mistakes and properly testing your setup ensures accurate stock management, correct pricing, and smooth WooCommerce operations across all locations.
Frequently Asked Questions (FAQs)
To help you better understand location-wise stock in WooCommerce, here are answers to the most common questions users search for before setting up multi-location inventory.
Does WooCommerce support location-wise stock by default?
No, WooCommerce does not support location-wise stock management by default. You need a plugin to manage inventory separately for multiple locations such as warehouses or stores.
What is the best plugin for location-wise stock in WooCommerce?
A complete solution like Plugincy Multi Location Product & Inventory Management plugin is ideal because it offers stock control, order routing, pricing, and analytics in one system.
Can I set different stock quantities for each location?
Yes, with a multi-location inventory plugin, you can assign separate stock levels for each location, ensuring accurate inventory tracking and better order management.
Can WooCommerce show different prices based on location?
Yes, this is possible using advanced plugins. The PRO version of multi-location inventory plugins allows you to set different prices depending on the store or region.
Why is my location-wise stock not updating?
This usually happens due to disabled sync settings, caching issues, or plugin conflicts. Enabling real-time sync and clearing cache often resolves the issue.
Do I need location-wise stock for a small store?
If you have only one store or warehouse, you may not need it. However, once you expand to multiple locations, it becomes essential for accurate inventory management.
Final Thoughts
Managing inventory across multiple locations without a proper system leads to stock errors, slow fulfillment, and operational confusion. Location-wise stock for WooCommerce solves these problems by giving you full control over inventory, pricing, and order routing from a single dashboard.
Whether you run multiple warehouses, retail stores, or regional fulfillment centers, implementing a location-based inventory system helps streamline operations and improve customer experience.
Ready to Take Control of Your WooCommerce Inventory?
If you are serious about scaling your WooCommerce store, managing stock by location is no longer optional. It is a must-have system for accuracy, automation, and growth.
Start using Multi Location Product & Inventory Management for WooCommerce by Plugincy to:
- Manage inventory across unlimited locations
- Sync stock in real-time
- Route orders automatically
- Control pricing and availability per location